In this article, you will learn the basic relay circuits and how to troubleshoot a relay in an electrical circuit.
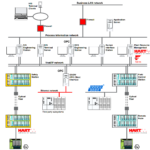
Relay Circuits
Relay circuits are electronic circuits that use relays to control the flow of electricity in a system. There are many different types of relay circuits, each with its own specific applications.
Here are a few common examples:
- SPST (Single Pole Single Throw) relay circuit: This circuit uses a single relay to control a single electrical load. It’s the simplest type of relay circuit and it’s used for on-off switching.
- SPDT (Single Pole Double Throw) relay circuit: This circuit uses a single relay with two sets of contacts, which can be used to control two different electrical loads. It’s commonly used to switch between two different power sources.
- DPST (Double Pole Single Throw) relay circuit: This circuit uses a single relay with two sets of contacts that can be used to control two different electrical loads. This is useful to have a single control for multiple circuits.
- DPDT (Double Pole Double Throw) relay circuit: This circuit uses a single relay with four sets of contacts that can be used to control four different electrical loads. It’s commonly used to reverse the direction of a motor.
- Latching relay circuit: This circuit uses a relay that can be latched in the on or off position. It requires a momentary pulse to change state.
- Timer relay circuit: This circuit uses a relay that is controlled by a timer. It can be set to turn on and off at specific times, or after a specific time delay.
- Overload relay circuit: This circuit uses a relay that is designed to protect a system from overcurrent. It’s commonly used in motor control circuits to protect the motor from damage.
These are just a few examples of the many different types of relay circuits that can be created. The specific circuit design will depend on the intended application and the requirements of the system.
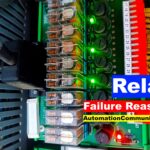
How to Troubleshoot a Relay?

Troubleshooting a relay can be done by following these general steps:
- Verify the circuit: Verify that the circuit the relay is connected to is functioning properly. Check for proper voltage, current, and wiring connections.
- Check the control circuit: Check that the control circuit is providing the proper input to the relay. This can include checking for proper voltage, current, and wiring connections.
- Check the relay coil: Check that the relay coil is receiving the proper voltage and that the resistance of the coil is within the specifications listed in the relay’s datasheet.
- Check the contacts: Check that the contacts are clean and that they are making good contact. Also, check that the contacts are not welded together.
- Check the mechanical parts: Inspect the mechanical parts of the relay, such as the actuator, for any signs of wear or damage.
- Check the environment: Inspect the environment where the relay is located for any conditions that may be causing the relay to fail, such as high temperature or humidity.
- Check the history: Look into the history of the relay, in case of any problems or issues with the relay reported by the user, or any previous maintenance done on it, or any modifications made.
- Check for any codes: If the relay is controlled by a PLC or other electronic control device, check for any error codes or diagnostic messages that may indicate a problem with the relay.
- Check the power supply: Make sure the relay is getting the correct voltage and that the power supply is functioning properly.
- Check the wiring: Make sure the relay is wired correctly and that all connections are secure.
- Check the load: Make sure the load, such as a motor or light, is functioning properly and not causing the relay to fail.
- Check the relay itself: Inspect the relay for any visible damage or signs of wear, such as burned or corroded contacts.
- Test the relay: Use a multimeter to test the continuity of the contacts and the resistance of the coil. A continuity test will confirm if the relay is closed or open, and a resistance test will confirm if the coil is burned out or not.
- Check for noise: Relays can be sensitive to electrical noise, so check for any sources of noise in the circuit, such as radio frequency interference or ground loops.
- Check for false triggering: If the relay is switching on and off unexpectedly, it could be caused by false triggering. Check for any voltage or current that could be activating the relay.
- Replacement: if all other steps are checked and the relay is still not working properly, it is likely that the relay is faulty and needs replacement.
Read Next: