Pressure Switch Calibration Procedure
What is a Pressure Switch?
A pressure switch monitors the pressure of a process by using a pressure-sensing element. A pressure switch comprises pressure sensing elements such as a diaphragm or bellows and the piston is connected to it, which is used for actuating the switch contacts. It is a force-balanced diaphragm or bellows actuated assembly. The applied pressure generates a force, and it is compared to the force of a pre-compressed range spring.
To ensure process quality and safe equipment operation, the calibration of pressure switches is a critical component.
Basics of Pressure Measurement
According to the definition, pressure is the amount of force exerted on a unit area of a surface. It is possible to measure pressure continuously or at a specific point.
There are three types of pressure measurement with pressure switches. Gauge pressure, absolute pressure, and differential pressure switch. Gauge pressure is the reference to barometric or atmospheric pressure at a given location. This is the most common type of pressure switch used in the industry today.
The purpose of calibration is to detect and correct errors in the pressure switch set point and dead zone.
List of Tools Required for Pressure Switch Calibration
- Multimeter
- Hand-held pressure pump with an attached digital pressure gauge.
- Spanner set to adjust pressure switch settings.
Pressure Switch Calibration Procedure
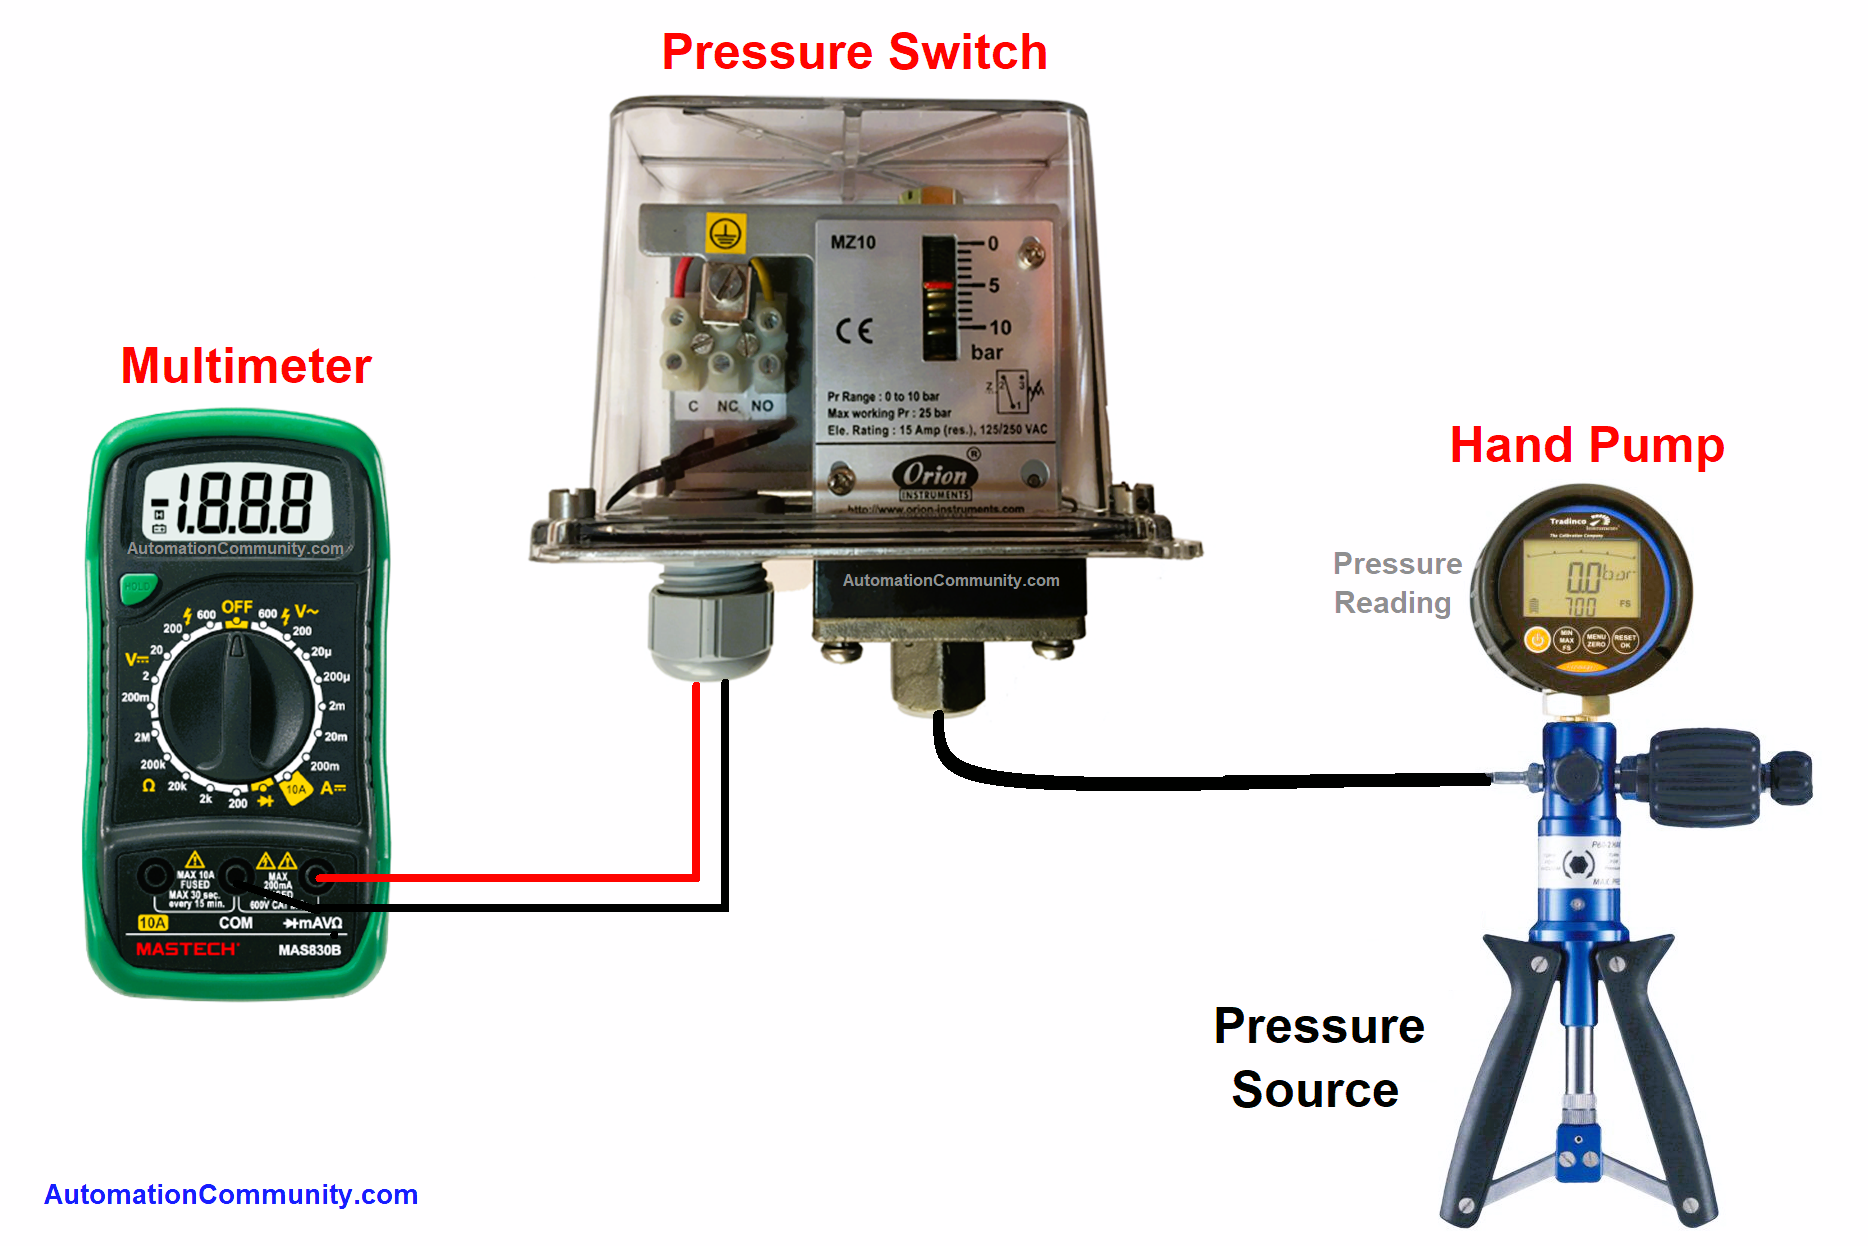
The pressure switch should be depressurized and isolated from the process line by following all safety procedures of the plant.
The pressure switch is connected by a hand-held pressure pump consisting of a test gauge and digital multimeter to the switch terminals.
Check that the pressure switch contact for the normally open (NO) circuit and normally closed (NC) circuit are correctly open or closed. Check this using a digital multimeter set to the continuity range of the switch.
Apply pressure to the switch set point using the hand-held pressure source. If the multimeter indicates a short circuit, stop increasing the pressure.
Note the pressure reading on the multimeter, which is the set pressure point of the switch to increase pressure.
Using the pressure source, apply pressure to the switch set point. If the multimeter displays a shot circuit, stop increasing further.
Take note of the pressure reading on the multimeter, which is the setting to increase pressure.
Next, Keep increasing pressure until the maximum pressure is indicated by the gauge.
Now, reduce the pressure gradually, until the switch return to the NO (normally open) state.
Take a reading of the pressure, which is the falling pressure set-point for the switch.
The rising pressure setting should be subtracted from the falling pressure setting.
Based on the two readings, the dead band of the switch can be determined.
This number should be compared with the dead band specified by the manufacturer. If it is higher than the manufacturer’s it is impossible to repair the switch.
The above procedure is repeated several times to check pressure switch repeatability.
Keywords
Wetted parts:
The components of a pressure switch are exposed to process fluid. In the case of the pressure switch, the bellows and diaphragm come in contact with the process fluid.
Rising pressure or set pressure
Increase the pressure source at the switch set point until the switch changes from open to close. Record the pressure value when the multimeter indicates short.
Falling pressure or reset pressure
Continue increasing the pressure up to the maximum rated pressure. Reduced the pressure slowly until the switch changed back to open and the pressure I recorded.
Dead zone
The pressure set point is recorded when the pressure is increasing. The dead zone value is the difference between the pressure set point rise and the pressure drop reset point.
Repeatability
It is also called test, re-test reliability. Under the same conditions, the result should be the same upon several retests.


